Tuesday, April 29, 2014

Learning How to Make a Yukata - Part Four: Tailoring

Upon first glance, it looks like the yukata is just sewn straight up and down through and through. And if you did that, probably only a small select elite few would be able to notice. However, interpreting Japanese DIY yukata patterns show subtle alterations. While one style of alternations is very obviously the most popular, I've come across a couple of different ones. I just want to draw attention to these before getting starting on the tutorial so the sewing instructions make a little more sense (they were hella confusing when I started out). I'm going to go out on a limb here and say that these tailoring techniques were probably developed in order to make the garment fit a human body a bit nicer without having to cut away or add extra fabric.

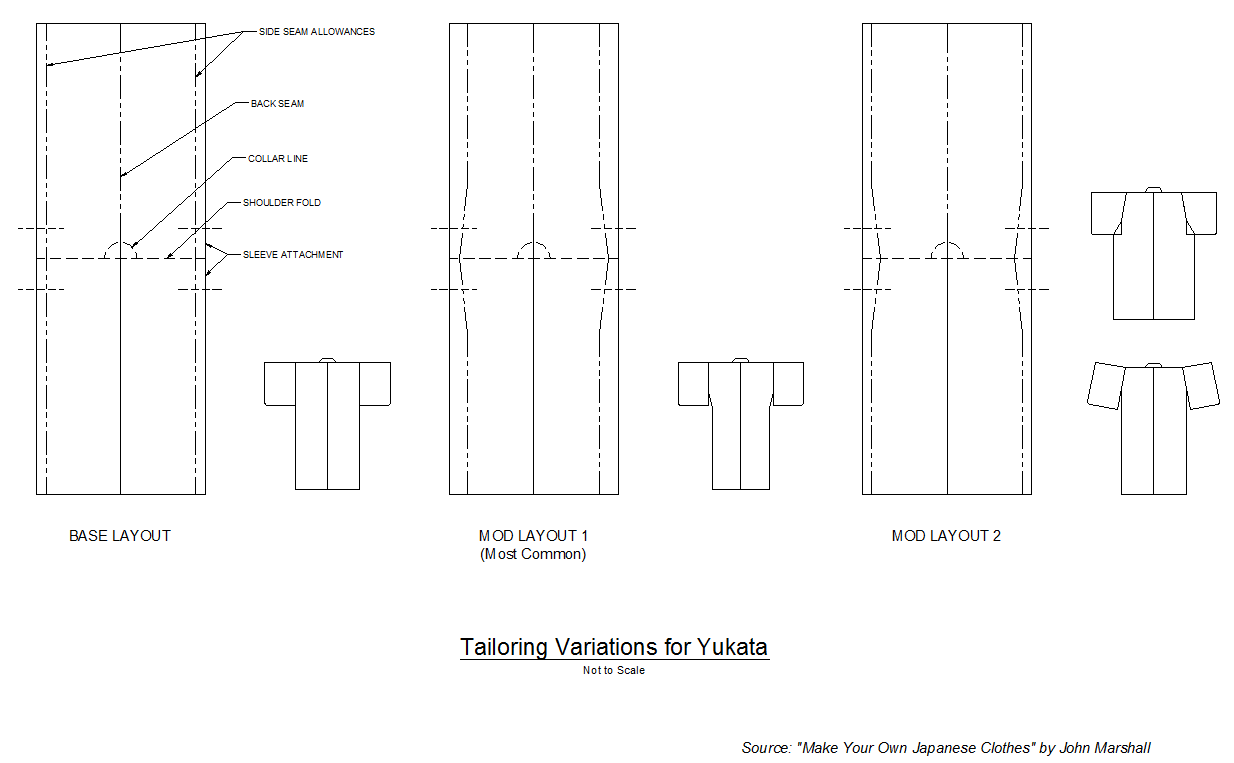
Below is a diagram that illustrates the various tailoring techniques I've come across. I'm sorry the preview below is pretty crappy so you can look at the full size here.


Mod Layout 1 is the popular one I mentioned above. I speculate that the tapering at the waist is to help reduce fabric bulk under the obi

However, if you are like me, and have the pear shaped body with a huge desk-job ass, having it narrower at the waist ultimately makes the whole thing look too small because it doesn't wrap around enough. Bah!! Time to lay off the ice-capps.

Mod Layout 2 looks more suitable for someone with a large belly.

I wish I knew the history surrounding these tailoring techniques but I haven't come across it yet in my research. Around what time did this become the standard way of doing things? I'll try to find out later.

But anyways, another technique to mention is in how the okumi extension panels are sewn on. Generally, one would assumed they are sew on straight up and down the length of the garment, but some yukata patterns show a slight curve near the top. By curve I mean the seam between the okumi and body panels starts to angle towards the shoulder after where the seam comes out from behind the obi (you catch that?). I believe this is only done on female yukata because this is claimed to balance the curviness of the female bust. It's so subtle that it's barely noticeable. I point an arrow to it in the picture below. Can you see it?

(Photo from Ichiroya.com)

This is a diagram of an okumi panel with the seams marked out. The red arrow points to the seam that attaches to the body. I've circles the differences in seam allowance between the top and bottom.

But anyways, now that we have some context established, I'll be moving on to the sewing tutorials. Stay turned for part 5!

Tuesday, April 15, 2014

Learning How to Make a Yukata - Part Three: Mens and Womens Differences

When it comes to sewing a yukata, there are three differences between a yukata for a man and for a woman.


Men's Yukata

Woman's Yukata
(Photos from Yukata Kimono Market.) 

Patterns and Colours
  • Women's patterns are often bright and consist of large floral or nature motifs. They can come in any colour but traditionally were mostly deep indigo. However, women tend to wear more subdued colours when they get older. 
  • Men's patterns often use stripes or subtle patterns, with usually subdued blacks, blues or greens. Sometimes prints include dragons, animals, or theatre motifs.
Length
  • It is customary for woman to wear ohashori (the fold seen underneath the obi) therefore women's yukata come longer than average woman's height in order to make the fold.
  • Since an ohashori on men's yukata is not used, the length is simply the height of the wearer.
 Sleeves
  • Since woman's obi are wider, they have "cut" away the sleeves from the body. Slightly more than half the length of the sleeve is left unattached. The edge is left open.
  • A man's sleeve is mostly attached to the body, leaving only a small flap. Often this flap is sewn closed.


Sorry, the measurements on the mens's sleeve is really hard to read on the dark picture above. It's 10 cm for the overhang and 37 cm for the attachment.

(Just a note: I don't have any research on children's yukata at this time. I will be leaving those out of the tutorial... for now.)

Stay tuned for part four; alterations!

Thursday, April 3, 2014

Learning how to Make a Yukata - Part One: The Bolt

浴衣の作り方
Yukata no tsukurikata (How to Make a Yukata)

When I first tried researching how to make a yukata, not only was it difficult to find them in English, but I could barely make heads or tails of the ones I did find. I've also seen this same frustration get echoed in online kimono forums from time to time. After several years of casual research and digesting bits and pieces of history and information on kimono, I've been able to produce one.


So now I'm going to write my sewing tutorial in a unique way. Instead of making it simply a sewing tutorial, I am making it descriptive with historical references and context. This will make it quite long and wordy, but bare with me. I believe that if you understand how the kimono "works", sewing instructions for it will be considerably easier to follow, at least that's how it worked for me. :)


浴衣の反物
Yukata no Tanmono (Yukata Fabric)


Yukata  浴衣 ["yu" (bath) + "katabira" (under clothing)], are constructed from long, thin bolts (called "tanmomo" 反物 or "boruto" ボルト) that are a standard size, usually around 36 cm's wide (14 to 15 inches) and 1200 cm long (472.5 inches). It is usually constructed of cotton and the print, which is usually hand dyed, shows on both sides.
Image from Ichiroya
The size of the yukata, particularly the width, is restricted to the width of the bolt. This width has been standardized in Japan for a few hundred years now, originating in the Edo Period around 1603 AD. All yukata, kimono, and haori construction is based on it. The images below illustrate basic kimono construction.


The basic design of the kimono was influenced by several historical factors. One of them was the need to conserve as much fabric as much as possible. Traditional construction methods consists of the absolute minimal amount of cuts possible to the fabric. This optimized its usability in several ways. For example, the traditional means of washing a kimono was to take out all of its stitching and baste it back into a mock bolt.
 
 Old photo showing Araihari 洗い張り; taking apart a kimono and washing it in a bolt.

Putting it back together was easy and the seams could be adjusted if the wearer had grown. The same could be done if the garment was passed to another person. Panels could be replaced if a section had worn out. When the garment was no longer suitable for wearing, it could be made into a work jacket or a futon cover.

Another factor is the width of the bolt that I mentioned above. As you can see in the image below,  how the loom was used to weave cloth (being tied to the waist) impacted the width.


Stay tuned for part 2, which will be about how to layout the panels on a fabric.

--------------------------------------

Here is one of my references, a page called "How to make a Yukata".

Wednesday, April 2, 2014

Kiri Mon

桐紋
So someone on the ImmortalGeisha forums said this:
五三桐 (Go san kiri)
"Its [the kirimon depicted above] a mon that anyone can use ^^ It is not specifically related to a family but free-to-use so to say ^^  (Source)"
Interesting. This is what Wikipedia says about it:
The Government Seal of Japan, also called the Paulownia Seal (桐紋 kirimon?) or Paulownia Flower Seal (桐花紋 tōkamon?), is a mon or a crest used by the Cabinet of Japan and the Government of Japan on official documents. One version is used as the official emblem of the office of the Prime Minister of Japan. It resembles a stylized paulownia flower with 5-7-5 leaves. It was the crest of the Toyotomi clan.
The go-shichi no kiri (literally in English Paulownia of 5-7), as it is alternatively called, represents the democratically elected representatives of the government as a contrast to the chrysanthemum of the Imperial Seal of Japan, which represents the Emperor of Japan, who is the symbol of the sovereignty of the state.

Again, from ImmortalGeisha Wiki:


Here is another description that I found on the net (from here).


Okay, so I've read it a few times. I wonder why the wikipedia page doesn't mention the "every man" use of it? I would like to find an academic source to confirm it (doing that in English will probably be a problem though. If anyone reading this happens to know one, please comment!)

Looking through Ichiroya certainly confirms this observation. A large part of their kurotomesode have the kiri mon on them, just like the one pictured below:


(Tehehe, hmmmm... my sister just moved into a new place with her boyfriend recently and my brother has a newgirlfriend..... Time to buy a  kurotomesode with a kirimon!!!! OMG OMG OMG THIS ONE WOULD MATCH MY OBI ~SQUEEEEEEEEEEEE~ )